
Grasshopper doesn’t take years to set up. In fact, it’s easy to set up your virtual phone system in 30 minutes. Yep, that’s right—less time than most scuba dives!
Step 1: Sign Up
Visit our sign up page. You’ll start by choosing one of our plans (SOLO, PARTNER, and SMALL BUSINESS). Then, you’ll choose a phone number (Custom Toll Free, Toll Free, or Local).
If you need help, call (800) 279-1455 and our support team will sign you up over the phone.
After you sign up, you’ll receive an email with your username and PIN. You’ll need to create a password. Once you’re logged in, our system will walk you through set up, making it easy to forward your calls to any cell or landline.
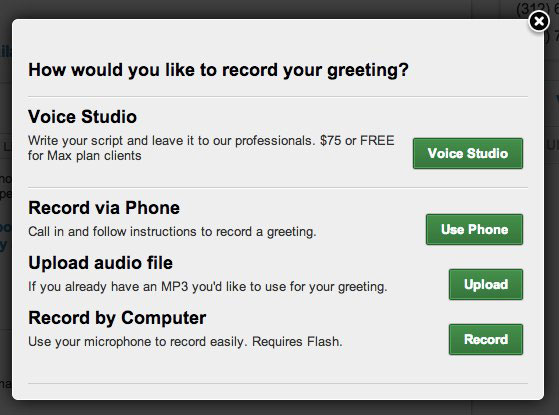
Step 2: Record a Main Greeting
Once you’ve signed up with a plan and phone number, you can record a main greeting. This message will be the first thing customers hear when they contact your place of business, so make sure the message is well-versed and professional. Choose a team member with a polite tone and follow the prompts to set your recording (we do offer a professional voice studio feature for those interested).
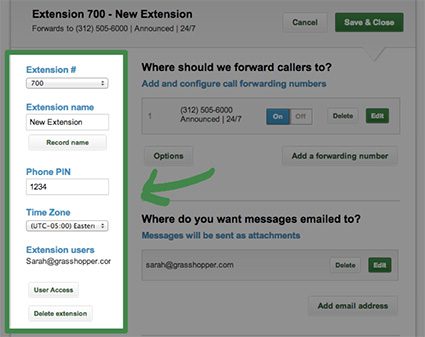
Step 3: Add Extensions
Grasshopper allows you to set up individual extensions for employees and departments.
When someone calls, they will be given the option to dial a specific extension to reach a specific person or department. You can set your extensions up in any way you please! For example, you might send one extension to yourself, another to your business partner, and a third to your assistant.
Step 4: Start Receiving Calls (You’re Done!)
Once you have selected a phone number, set up a custom message, and assigned extensions, you are ready to receive calls, voicemails, and faxes. You can manage your phone calls and voicemails online or directly from your phone.
Setting up your virtual system has never been easier. No more waiting for a tech to come and install your systems!
Visit Our Knowledgebase to Learn More about Setting Up
We’ve explained how to set up and get going today, but it doesn’t have to stop here. We have tons of other features that you may want to consider. Visit our Knowledgebase to learn more:
